Laravel Websockets on Forge (The Complete Guide)
The popular Laravel Websockets package makes it really easy to get realtime functionality working on your Laravel projects, but what happens when it's time to deploy? If you''re using Forge, this article guides you through every step of the way.
Let's start with a simple project. I've written this (and in fact, the entire article) as baby steps intentionally, while you're figuring out how to deploy this to Forge, you don't want to miss anything and waste hours over a misconfiguration!
Following this guide assumes you have the following:
- A Forge account, configured to have access to your GitHub repositories
- A domain you're not currently using, to test with (really important)
- A DigitalOcean account to provision servers on
If you have a slightly different setup (e.g. you're using Linode instead of DigitalOcean) you should be fine. As long as you're able to deploy something to Forge and edit DNS settings for the domain you're going to use, that's great.
Creating a project to test with
You may already have a project ready to deploy (or even deployed), but I always find it a lot easier to play around with a fresh project to avoid complication. Totally up to you though, and you can skip this section if you wish.
Install Laravel
Start with creating a new project.
composer create-project laravel/laravel websockets
cd websockets
Then get the laravel/ui package pulled in so we can generate UI scaffolding. We're using Vue so we can listen for websocket events in a component.
composer require laravel/ui
php artisan ui vue --auth
npm install
npm run dev
Now configure your database. We'll be using the default authenticated dashboard view to connect to our websocket channel. Although it'll be a public channel, it makes sense to set this up if you want to test private channels.
DB_CONNECTION=pgsql
DB_HOST=127.0.0.1
DB_PORT=5432
DB_DATABASE=websockets
DB_USERNAME=alexgarrettsmith
DB_PASSWORD=
Run your default migrations.
php artisan migrate
Start up a local development server, and you should see your freshly built app.
php artisan serve
In the browser, head to your freshly built app. Register an account within Laravel, and land on your dashboard.
Setting up Laravel Websockets
Now we'll get the beyondcode/laravel-websockets package installed and successfully listening for events we choose to listen to.
composer require beyondcode/laravel-websockets
Publish and migrate the migrations for the dashboard entries.
php artisan vendor:publish --provider="BeyondCode\LaravelWebSockets\WebSocketsServiceProvider" --tag="migrations"
php artisan migrate
Publish the config file.
php artisan vendor:publish --provider="BeyondCode\LaravelWebSockets\WebSocketsServiceProvider" --tag="config"
We're using Laravel Websockets as a Pusher replacement, so let's get that configured next.
Install the pusher/pusher-php-server package.
composer require pusher/pusher-php-server "~3.0"
In .env, change the default broadcast driver over to pusher
BROADCAST_DRIVER=pusher
At this point, also head over to config/app.php and make sure App\Providers\BroadcastServiceProvider::class is uncommented from the providers section. This enables the ability to broadcast to websocket servers from events in Laravel.
Now in config/broadcasting.php update the pusher config to work locally, rather than use Pusher's servers.
Your pusher connection should look like this.
'pusher' => [
    'driver' => 'pusher',
    'key' => env('PUSHER_APP_KEY'),
    'secret' => env('PUSHER_APP_SECRET'),
    'app_id' => env('PUSHER_APP_ID'),
    'options' => [
        'cluster' => env('PUSHER_APP_CLUSTER'),
        'encrypted' => true,
        'host' => '127.0.0.1',
        'port' => 6001,
        'scheme' => 'http'
    ],
],
Now's a great time to set our Pusher credentials in .env. Just set these to all local for now.
PUSHER_APP_ID=local
PUSHER_APP_KEY=local
PUSHER_APP_SECRET=local
PUSHER_APP_CLUSTER=mt1
Now fire up Laravel Websockets on the command line.
php artisan websockets:serve
Exit from the php artisan serve command and re-run it. This brings your new configuration into effect.
Head over to http://localhost:8000/laravel-websockets, hit the Connect button, and you should see the connection events start rolling in.
That's our Websockets server set up and ready to go.
Fire an event
Keeping the Laravel Websockets dashboard open, we'll now create a Laravel event, broadcast it, and hope that we see it in the dashboard.
php artisan make:event Test
Open that event up and implement the ShouldBroadcast interface, add some dummy data via the broadcastWith method, switch the channel type to Channel and the channel name to test.
Your event class should look like this.
class Test implements ShouldBroadcast
{
    use Dispatchable, InteractsWithSockets, SerializesModels;

    /**
     * Broadcast this data
     *
     * @return array
     */
    public function broadcastWith()
    {
        return [
            'it' => 'works'
        ];
    }

    /**
     * Get the channels the event should broadcast on.
     *
     * @return \Illuminate\Broadcasting\Channel|array
     */
    public function broadcastOn()
    {
        return new Channel('test');
    }
}
Now create that test channel over in routes/channels.php.
Broadcast::channel('test', function ($user) {
    return true;
});
Now create a simple closure-based route in routes/web.php to broadcast the event.
Route::get('/broadcast', function () {
    broadcast(new Test());
});
Head to [http://localhost:8000/b](http://127.0.0.1:8000/laravel-websockets)roadcast and check the Laravel Websockets dashboard, you should see a new api-message event roll in, with the details as something like Channel: private-test, Event: App\Events\Test.
You're now successfully broadcasting messages to the websockets server.
Listen for events
We'll use Laravel Echo to listen for this Test event, and dump something to the console within a Vue component.
First, install the laravel-echo and pusher-js libraries
npm install laravel-echo pusher-js
Now uncomment the Laravel echo code in resources/js/bootstrap.js.
import Echo from 'laravel-echo';

window.Pusher = require('pusher-js');

window.Echo = new Echo({
    broadcaster: 'pusher',
    key: process.env.MIX_PUSHER_APP_KEY,
    cluster: process.env.MIX_PUSHER_APP_CLUSTER,
    forceTLS: true
});
Update the options passed into Echo to the following
window.Echo = new Echo({
    broadcaster: 'pusher',
    key: process.env.MIX_PUSHER_APP_KEY,
    cluster: process.env.MIX_PUSHER_APP_CLUSTER,
    wsHost: process.env.MIX_PUSHER_HOST,
    wsPort: 6001,
    forceTLS: false,
    disableStats: true,
    scheme: process.env.MIX_PUSHER_SCHEME
});
You'll notice some environment variable references here. That's because the websocket server we'll be connecting to will change between environments.
Add these to your .env file
MIX_PUSHER_SCHEME=http
MIX_PUSHER_HOST=127.0.0.1
Recompile all assets
npm run dev
Now pull the example-component into your home.blade.php file
@extends('layouts.app')

@section('content')
    <example-component />
@endsection
Update the ExampleComponent.vue file.
<template>
    <div></div>
</template>

<script>
    export default {
        mounted () {
            console.log('Component mounted.')

            Echo.channel('test')
                .listen('Test', (e) => {
                    console.log(e)
                })
        }
    }
</script>
This listens, with Echo, on the test channel for the Test event.
Recompile your assets
npm run dev
Head over the dashboard where that Vue component is, give it a good refresh and then visit [http://localhost:8000/b](http://127.0.0.1:8000/laravel-websockets)roadcast again.
You should see the {it: "works"} object dumped to the console, which means you're now successfully listening for broadcasted events!
Pushing to version control
We need to push our project to version control, so Forge can pull it down and deploy it.
I'm using GitHub, but the steps here will be very similar to any Git-based version control service.
First, initialise a Git repository in your project.
git init
We want to compile frontend assets on the server when deploying, so add the public app.js file to the .gitignore file.
/public/js/app.js
Add everything and commit.
git add .
git commit -m "Initial"
Now create a new repository on GitHub (or whatever service you're using). Replacing the vendor and repository name below, push it up.
git remote add origin https://github.com/[vendor name]/[repository name].git
git push origin -u master
Now we can get this project deployed to Forge.
Deploying to Forge
You'll need a domain name for this part, because we'll be creating a subdomain for our websocket connection. Nearly all developers have spare domains lying around for projects they never started. The domain I'm using is nuxtcasts.com.
There are also many ways you can set Forge servers up. Here, I'm just using DigitalOcean with a Postgres database.
Create a Forge server
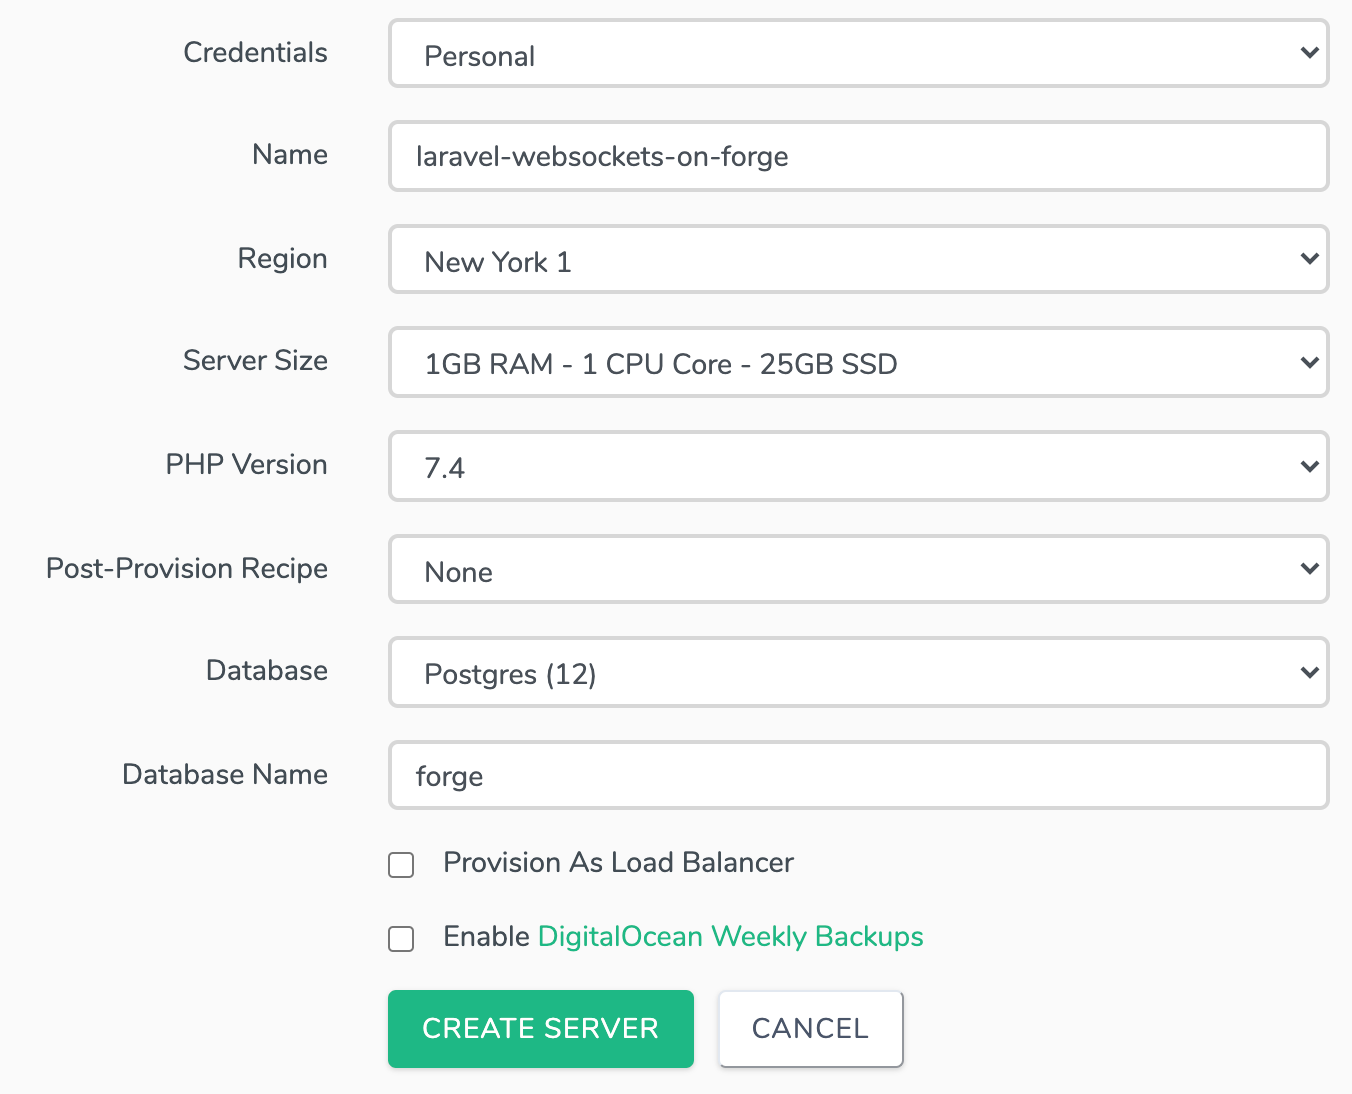
Head to the Forge dashboard and click the DigitalOcean option, which reveals a list of configuration options for your server. It doesn't really matter what you choose at this point.
Here's how I'm configuring my server for this article.

Create the server and make a note of the database password. It'll be presented to you in a pop-up.
Grab a cup of tea/coffee and wait for it to provision.
Create a new site
We're going to attach a domain to our site so we can test it properly, as if it were a production site.
Choose the default site from the Active Sites list, then scroll to the bottom and hit Delete.
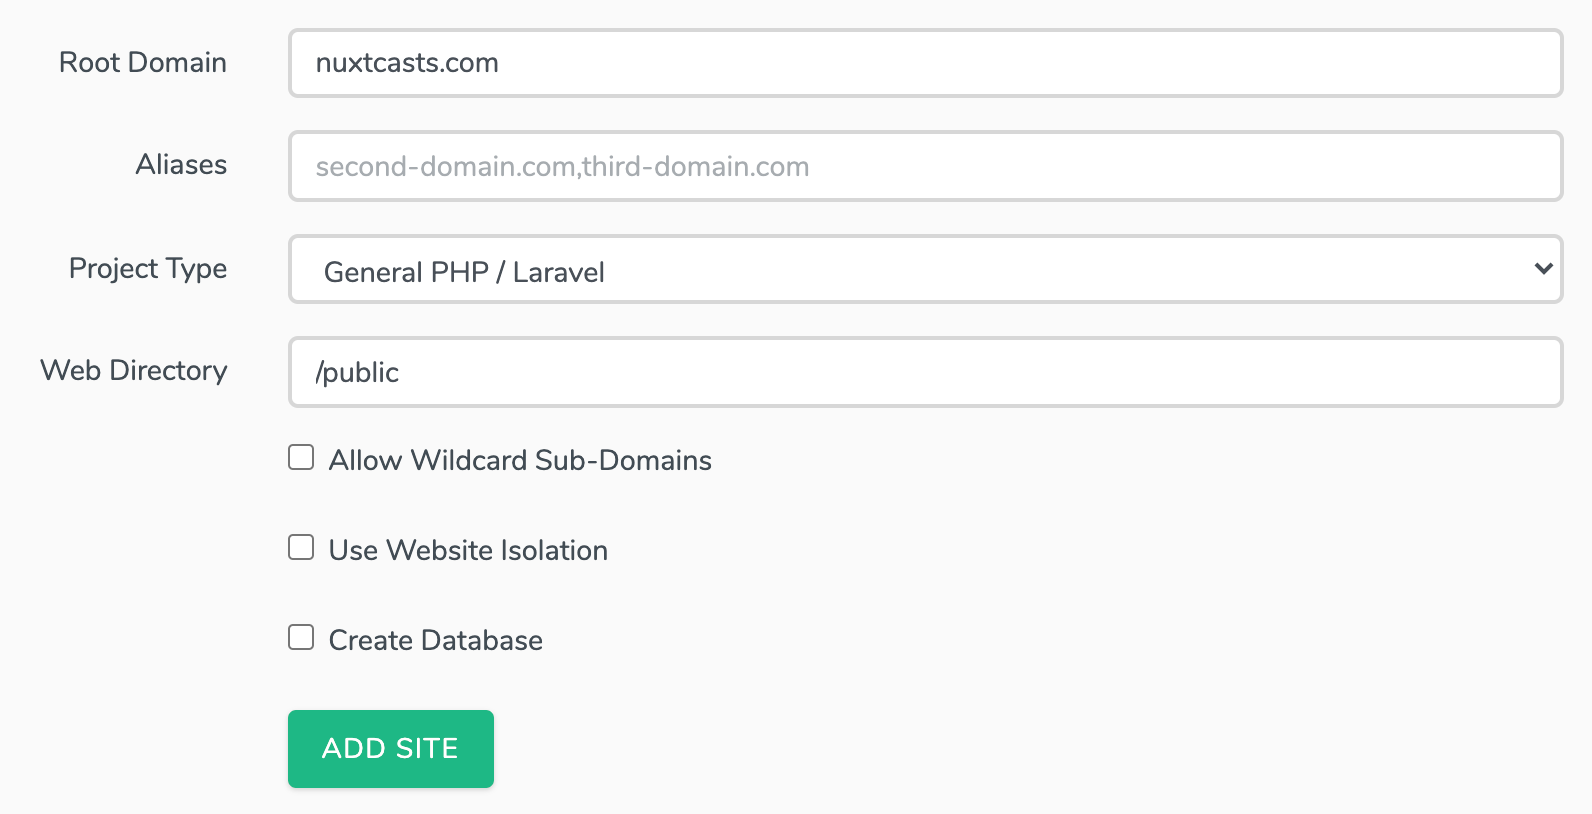
Now head back to the server on Forge and create a new site with the domain name as the Root domain (nuxtcasts.com in my case).

Deploy your project
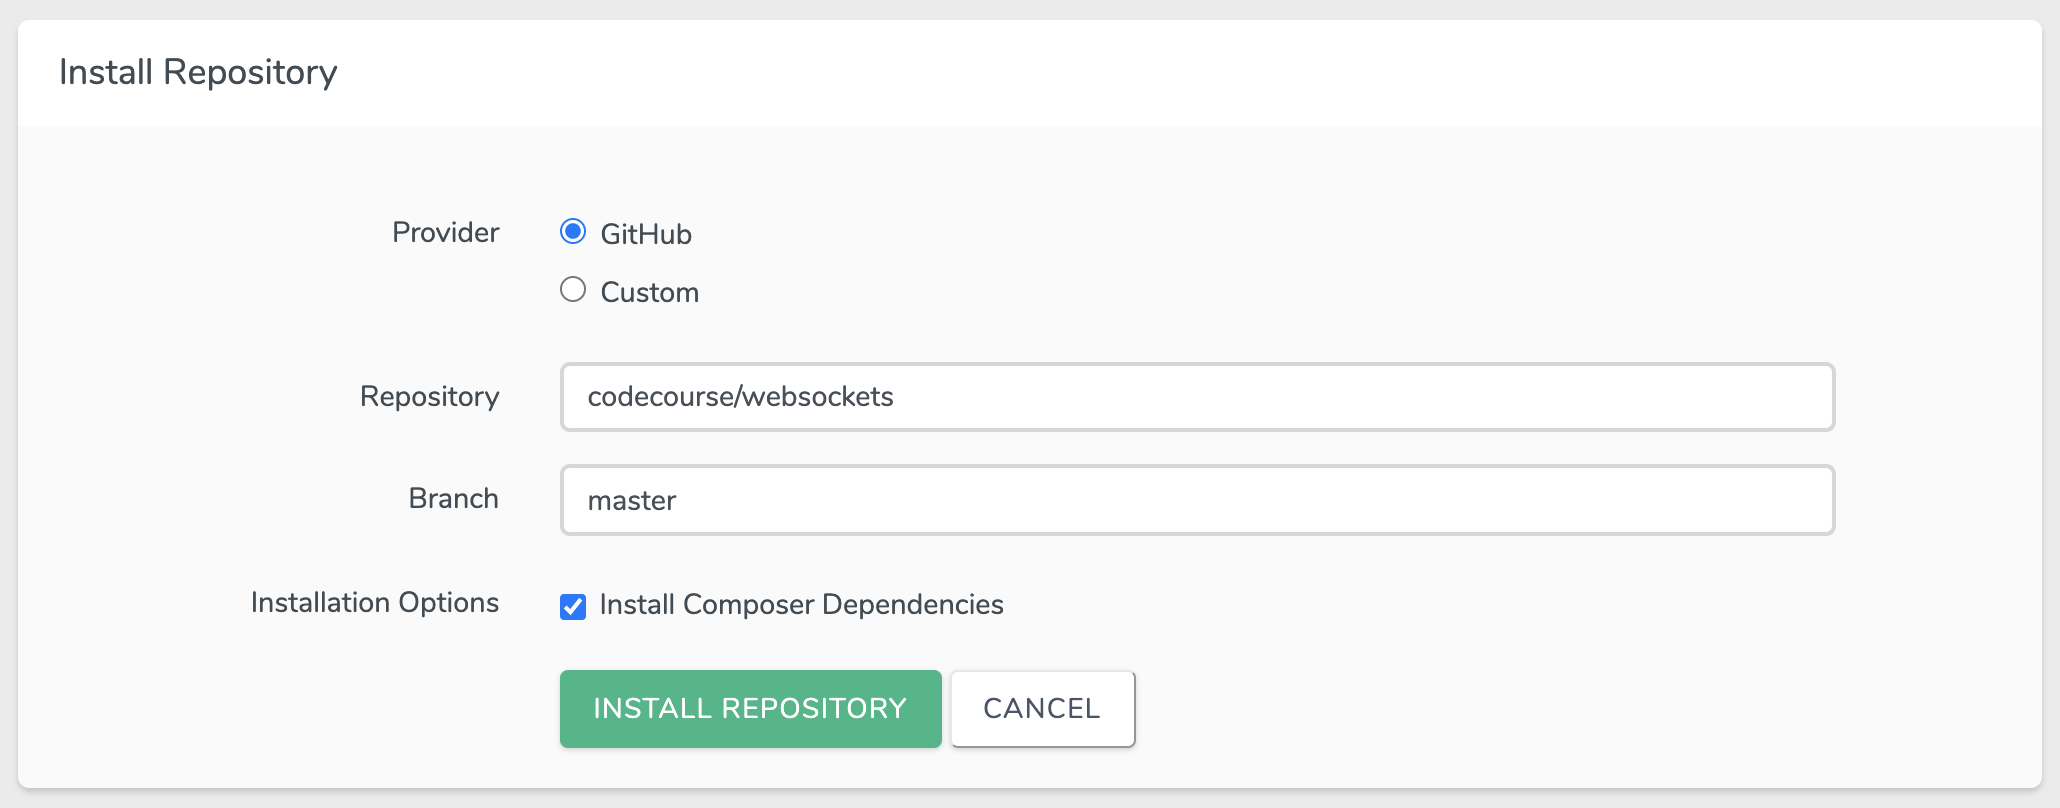
Once the site is created, hit the GitHub deployment option.
Enter the repository you pushed to earlier and install the repository.

Under the Deploy script section of that new site, we'll update this to compile our assets. The first few lines of the deploy script should look something like this.
cd /home/forge/nuxtcasts.com
git pull origin master
composer install --no-interaction --prefer-dist --optimize-autoloader
npm install
npm run prod
The lines that were added here were npm install and npm run prod.
Head over to the Environment menu item, hit Edit environment and paste in your local .env file contents.

Change the APP_ENV value to production. You can leave APP_DEBUG as true for now, but make sure it's set to false when you're done with setting everything up successfully.
Also update the DB_DATABASE, DB_USERNAME and DB_PASSWORD values to reflect the database provisioned on Forge.
Save that out.
Back over on the Apps menu option, hit Deploy now and your project will be deployed. You won't be able to visit the project just yet, because the Nginx configuration is expecting us to visit from nuxtcasts.com.
Link your domain
This varies depending on who you've registered the domain with. On your domain registrar, find out where to change the nameservers of your domain and update them to the following.
ns1.digitalocean.com
ns2.digitalocean.com
ns3.digitalocean.com
Now sign in to DigitalOcean dashboard and go to the Networking menu option.
Add your domain name.

Once that's done, configure the A record for the domain to point to the server you created through Forge.

You'll likely need to wait a while for your domain nameservers to propagate, but keep trying to access your domain name in the browser (not HTTPS, for now), and you'll eventually end up at your Laravel project.
From here, register an account as normal and end up at your dashboard.
Add SSL
Thankfully Forge makes this really easy. We'll go with the LetsEncrypt option.
Head to the SSL menu option and choose LetsEncrypt. Enter the domain name and hit Obtain certificate. I've removed the www. option here, because we didn't set up a www CNAME record and would fail at this point if not removed.

Your SSL certificate should now be installed and activated automatically. Head over to the https:// version of your domain.
That's your site deployed successfully to Forge, using a domain name and SSL. Basically everything you'd expect from a production site.
Now we can get Laravel Websockets working.
Laravel Websockets on Forge
Our websocket server is configured to run on port 6001, so we're going to need to proxy a request to port 443 (SSL) into 6001.
Right now, on your Laravel app dashboard, Laravel Echo will be attempting to connect to 127.0.0.1 for a websocket connection, because that's what we set in our .env file (which we copied over directly to Forge).
MIX_PUSHER_HOST=127.0.0.1
We can't just change this to nuxtcasts.com, because the websocket server runs on port 6001. Like I said before, we need a proxy.
I've found the easiest and cleanest way to do this is with a subdomain.
Creating a subdomain for the websocket connection
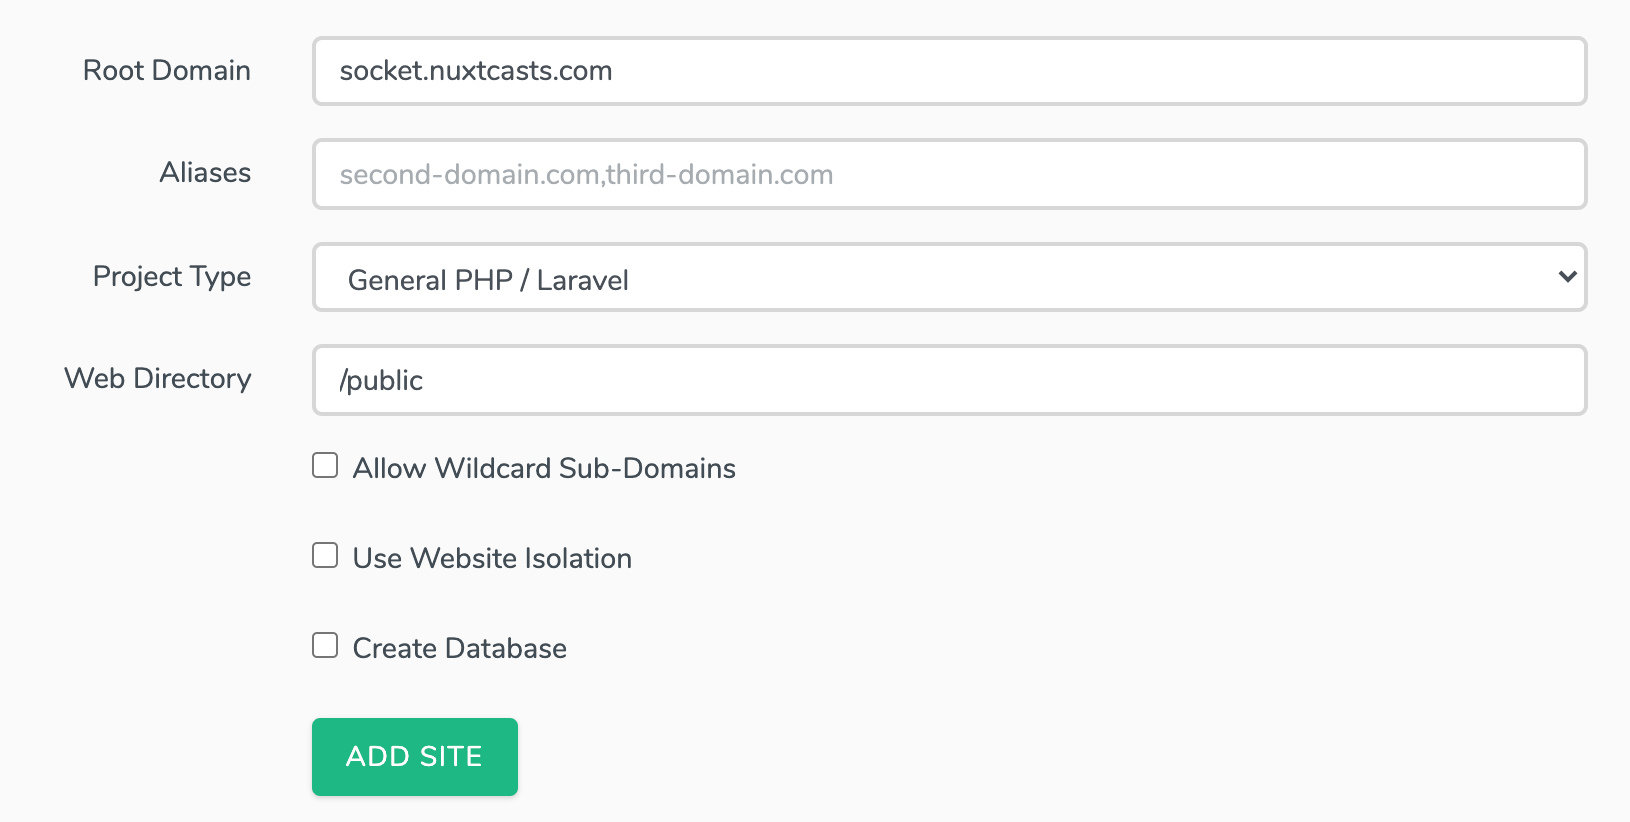
Head back to your *server *in forge and create a new site with a socket subdomain. For me, that's socket.nuxtcasts.com. Leave everything else as it is.

There's no need to hook up a repository to this site, as we're just using it as a proxy to our main site.
Add SSL
Follow the same process for setting up SSL using LetsEncrypt. Just make sure the domain name includes the subdomain.

Reverse proxy
We'll now use a reverse proxy to proxy traffic from socket.nuxtcasts.com on port 443 to 6001.
At the bottom of the subdomain site, choose from the files menu and click Edit Nginx Configuration.
Find the following snippet
location / {
    try_files $uri $uri/ /index.php?$query_string;
}
Replace it entirely with the following
location / {
    proxy_pass             http://127.0.0.1:6001;
    proxy_read_timeout     60;
    proxy_connect_timeout  60;
    proxy_redirect         off;

    # Allow the use of websockets
    proxy_http_version 1.1;
    proxy_set_header Upgrade $http_upgrade;
    proxy_set_header Connection 'upgrade';
    proxy_set_header Host $host;
    proxy_cache_bypass $http_upgrade;
}
I'm no Nginx expert. This snippet is taken directly from the Laravel Websockets documentation.
Save the configuration and make sure you see a message similar to the following. That means your Nginx configuration is all good.
nginx: the configuration file /etc/nginx/nginx.conf syntax is ok
nginx: configuration file /etc/nginx/nginx.conf test is successful
Update DNS
You'll now need to head back over to wherever you're managing your DNS and add an CNAME record for socket. In my case, this is DigitalOcean.

Update the websocket host
Back on the main site (nuxtcasts.com in my case), we're still attempting to connect to 127.0.0.1 for websocket connections.
We have our new subdomain proxy for this, so go ahead and update your environment to reflect this.
MIX_PUSHER_HOST=socket.nuxtcasts.com
Now redeploy the main site so the JavaScript configuration takes effect.
Run websockets!
We've done a lot of work to hook everything up properly, but we're not running our websocket server on Forge.
For this, we'll run a Daemon.
Head to your server in Forge and choose the Daemon menu option. Add the Daemon to run Laravel Websockets as follows, replacing your site name in the Directory.

Here's the command for easy copy/pasting.
php artisan websockets:serve --port=6001
Once that's added and running, you have the websocket server started.
Testing it out
Fingers crossed. At this point you should be able to visit your domain, sign in, land on the dashboard and then hit /broadcast in another tab and see the output from the command we saw earlier when testing locally.

Phew
That was a lot of work from start to finish, but I hope this has given you good practice in getting websockets set up in an app, and then on Forge.
Once you've done this a few times, it's only a matter of copying and pasting the Nginx configuration. With practice, you'll be able to handle the rest without referring to this, or any other guide.